C++ Object Creation Like Anything
C++ looks pretty simple on the surface… you write a class, create an object, and move on. But under the hood, the compiler is busy stitching together memory layouts, hidden pointers, and constructor calls. In this writeup, we’ll reverse a small class, trace what really happens during construction, and map out how its objects live on the stack and heap. The code we’ll be taking as an example is as follows:
class Base
{
public:
    int a;
    char c;
    Base(int a, char c)
    {
        this->a = a;
        this->c = c;
    }
};
int main()
{
    Base B1(5, 'a');
    Base *B2 = new Base(9, 'x');
    return 0;
}
We have a simple class named Base having two data members int a and char c. Our objects will be created using a parameterized constructor which takes two parameters and sets the data members accordingly.
Since I’m compiling with g++ (GCC) on Linux, my program follows the Itanium C++ ABI. We compile as:
# compile a C++ program
g++ object.cpp -o object
Static Analysis using IDA
If we take a look at its disassembly generated by IDA:
push    rbp
mov     rbp, rsp
push    rbx
sub     rsp, 28h
mov     rax, fs:28h
mov     [rbp+stack_canary], rax
xor     eax, eax
From lines 1 to 2 we have the function prologue. At line 3 (push rbx) we are saving rbx on the stack because it’s a callee-saved register, and the function must restore it before returning. At line 4 we are allocating some space on the stack which is 0x28 (40 bytes). Later from lines 5 to 6 we save our stack canary on the stack. Moving further with the disassembly we have…
lea     rax, [rbp+var_20]
mov     edx, 61h ; 'a'  ; char
mov     esi, 5          ; int
mov     rdi, rax        ; this
call    _ZN4BaseC2Eic   ; Base::Base(int,char)
Stack-born objects
We see some offset relative to rbp on the stack that is rbp+var_20. Recall from the C++ code snippet, we have our first object created like Base B1(5, 'a'). rbp+var_20 is actually the address of this object. In C++ OOP terms, rbp+var_20 is actually our this pointer which points to our object. On line 12 we call our constructor for Base class, and since it’s a parameterized constructor, so we set some arguments to it from line 9 to 11. According to Intel x86-64 function calling conventions, our arguments to functions go according to an order. rdi holds the first argument, rsi the second, rdx, rcx, r8 and r9 hold the third, fourth, fifth and sixth argument respectively, and the rest are pushed onto the stack in reverse order. When calling a constructor, rdi will always hold a reference to the this pointer, same goes to the member functions of that class when called using that object, except for static members, which don’t need an object to be used/invoked.
An important thing to notice is that when we compile our C++ code with g++, we don’t see function names like Base::Base(int, char) in the disassembly generated by IDA. Instead, we encounter some funny looking, mangled names like:
_ZN4BaseC2Eic
What the heck is _ZN4BaseC2Eic?
It does look scary but actually it’s just a mangled name for Base::Base(int, char), and can be easily cracked. Lets break it…
| Mangled Part | Meaning |
|---|---|
_Z |
All Itanium ABI names which are used by GCC on Linux start with _Z. |
N ... E |
N starts a nested name like a class. E marks the end of the nested scope. |
4Base |
The number before a name tells its length. So 4Base is actually the length of the name of the class that is Base (length 4) followed by the class name. |
C2 |
Indicates a complete object constructor. |
Eic |
Encodes the function parameters: i = int, c = char. |
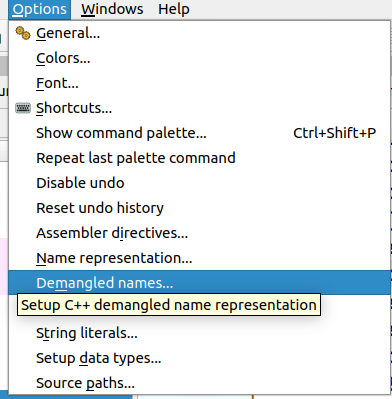
However name mangling can be disabled in IDA by navigating to Options, then select Demangled names.
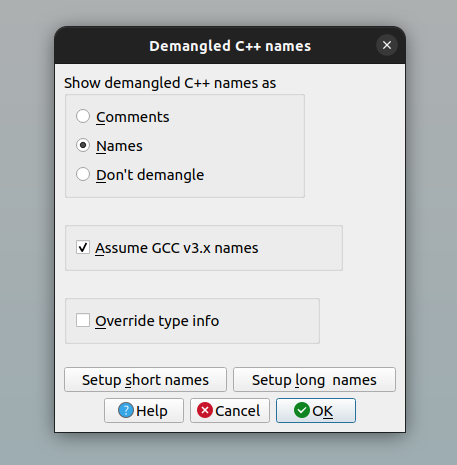
and then set the following settings
Finally, lets dig into the Base constructor… the call to our constructor is something like this;
Base::Base(this_pointer, 5 ,'a')
Taking a look at our constructor’s disassembly…
endbr64                 ; Alternative name is 'Base::Base(int, char)'
push    rbp
mov     rbp, rsp
mov     [rbp+var_8], rdi
mov     [rbp+var_C], esi
mov     eax, edx
mov     [rbp+var_10], al
We can see, that after our function prologue, at line 4, our this pointer is getting stored inside [rbp+var_8] which was passed in rdi. At line 5, esi which holds our second argument, 5, is stored at [rbp+var_C], and edx which holds our third arguments is moved to [rbp+var_10] at line 6 and 7.
mov     rax, [rbp+var_8]
mov     edx, [rbp+var_C]
mov     [rax], edx
mov     rax, [rbp+var_8]
movzx   edx, [rbp+var_10]
mov     [rax+4], dl
nop
pop     rbp
retn
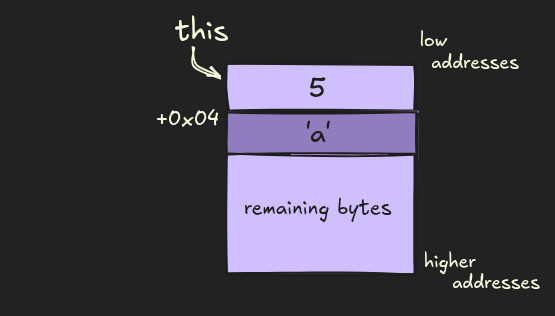
From line 8 onward, we start storing our arguments inside our object. rax holds our this pointer. First var_C which holds 5 gets stored at the location rax is pointing to. Then at line 13 we see that we are storing our character currently stored in dl at an offset of +0x04 from where rax is currently pointing at, giving us a final layout like:
lets return back to our main function and continue analysis.
mov     edi, 8          ; unsigned __int64
call    operator new(ulong)
The creation of the object B1 is complete which was created on the stack.
Heap-born objects
Lets now see, how our second object is created, B2 which is created via new operator, on the heap. Operator new is the C++ global allocation function, equivalent to malloc in C. It’s signatures are as
`void* operator new(std::size_t n);`
as defined in C++ standard library.
The compiler passes the size in rdi register and calls operator new to get memory, as seen in the signature. The return value is a pointer to the allocated memory and that is stored in rax after the call. Before calling operator new, we set rdi as 8, means now we have allocated 8 bytes on the heap and the starting address to that memory is stored in rax.
mov     rbx, rax
mov     edx, 78h ; 'x'  ; char
mov     esi, 9          ; int
mov     rdi, rbx        ; this
call    Base::Base(int,char)
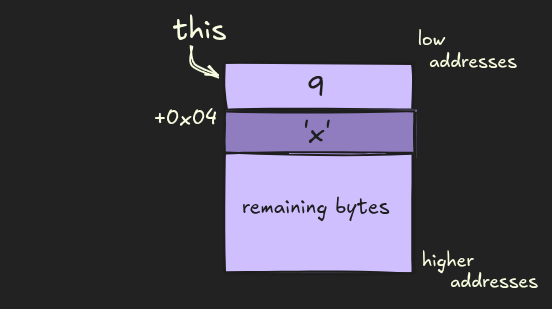
As seen in line 15, we store our returned pointer in rbx. Now we set our arguments, as seen in the C++ code, we are constructing a new object B2, with arguments 9 and ‘x’. For that we set rdi as our first argument (this pointer), our second argument rsi as 9 and rdx, our third argument as ‘x’. Then we call our Base constructor again whose disassembly we just discussed.
The final layout is like…
We finally return to our main function…
mov     [rbp+var_28], rbx
mov     eax, 0
mov     rdx, [rbp+var_18]
sub     rdx, fs:28h
jz      short loc_11D7
Here at line 20, we’re saving the address of our newly created object on the heap whose address was stored in rbx at [rbp+var_28]… then from line 21 onward, we are checking whether there was some messing up with our stack canary or not and based on that we either give a call to….
call ___stack_chk_fail
or in case of peaceful conditions…
 loc_11D7:
mov     rbx, [rbp+var_8]
leave
retn
we first restore our rbx, and then hit our function epilogue :)
Dynamic Analysis using GDB
Lets take a look at this in GDB to have a better idea of what’s happening under the hood!
Lets first take a look at the creation of B1 object which is created on the stack.

This address gets stored in rdi and all the arguments are set (reference the assembly snippets discussed previously side by side) and the constructor call is made.

First we store our integer value which is our a data member at the location where we have our this pointer at, which is also stored in rdi.
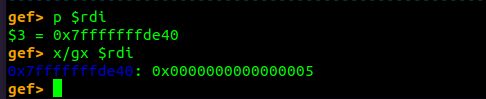
next we have to store our character that is ‘a’, in our c data member, having an ASCII of 0x61 in this case 4 bytes after where our this pointer is currently at.

and this is what we get… our arguments are neatly stored inside our object. Lets return to main to see how things will be stored in our object B2 on the heap!
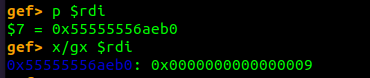
First as discussed earlier, we get 8 bytes allocated on the heap

The address of our object is 0x55555556aeb0and now we call our Base constructor.

rdi is pointing to the freshly allocated 8 byte area on the heap. First as seen earlier, we store our integer which in this case is 9, after which we get the following result:
and then we store our character… which in this case is ‘x’ having as ASCII of 0x78.

Then we finally return to main after both of our objects have been created, and end our program! I guess that is it for today.
Happy Reversing!